I took 11,693 photos in August. That’s 298 gigabytes of RAW images, 314 gigs including the proofs and assorted detritus from processing.
It’s a lot of space, because I shoot RAW, and because, well, it’s a lot of 36 megapixel images. Like, a lot.
Someone asked recently how I manage all these photos, and settle in, ’cause I’m going to tell you.
Step 1: Storing the Files
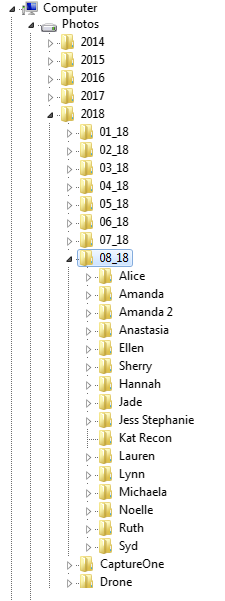 My photos are scattered all over several drives, grouped by year. The last 3.5 years are on one drive, an 8TB monster that’s nearly full. The previous two years fit on 2TB, and everything from ~1996 until the end of 2012 fits on another 2TB. Photos and drives get bigger as time goes on, I have proof!
After every shoot the memory card is dumped onto the current drive. My files are grouped year -> month -> client/location name. That Japan trip last year: 2017 -> 08 -> Japan. That shoot with Lynn? control-F -> Lynn -> there it is.
Every night the computer runs a backup, copying the current drive to two other drives. I use a backup program for this, but it doesn’t do anything beyond copying the files. No fancy RAID arrays, complicated differential backup schemes, etc. If anything goes wrong, there’s a drive somewhere with every file on it. Nothing gets deleted, ever.
Step 2: File Triage
For client shoots, every file is converted to a low-res proof image, watermarked, and thrown onto the server. It’s automatically converted to a PC- and phone-friendly gallery with a shortlist function so clients can scan through the images, and keep track of the good ones.
For my own purposes, I rank them all. While this sounds daunting (11,600 photos this month!) it’s pretty easy when you do this after every shoot. It takes 5-10 minutes, and is a crucial part of the process.
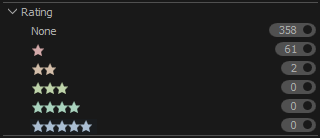
I go through the entire shoot. It’s usually immediately obvious if a photo is halfway decent, and I tag it with one star. Typically this will get me down to 10% (my rule of thumb is 4% for every shoot – the rest, while fine, aren’t worth editing). Then, I run through the one-star images, and tag anything that’s actually good with a second star. Along the way I’ll usually find clusters of similar files, and I’ll flick between ’em to pick the best, and occasionally demote anything that doesn’t actually deserve the first star. Rarely, I’ll do a third pass if the second pass doesn’t yield a solid list.
So I’m down to 5-20 photos from every shoot, and these are the ones I’ll edit up for my own purposes. Sometimes I’ll be so excited I’ll share one immediately, making sure it goes to the right place (Instagram, deviantart, this blog, etc).
Step 3: The Reason You Never See Them
The next day, doubt sets in. Is this really good? Hmm, this could have been better, and this is sort of rubbish actually. Augh, I didn’t notice this before. I should have changed this, oh it’s all shit, everything sucks.
Then the client sends in their shortlist and none of them are the same as the ones I picked and my worst fears are confirmed: I don’t know what I’m doing and I don’t recognize a good photo.
Then, through a veil of tears, I edit the client’s chosen images, knowing full well they’ll hate them and expose me as a fraud. I upload these final photos to the gallery, send a link to the client, then turn off the computer and bury my phone in the yard so I never find out how much they hate them all.
Usually though, they lie. They tell me they aren’t so bad, they love them in fact, and they post them on Instagram with enthusiastic recommendations for my services. I know I’m a fraud, they know it too, but…
Then someone else books a shoot, and maybe I’m not so bad after all! Hey yeah, I can do this, I got this shit covered!
And the cycle repeats itself.
Ah, the life of an artist.